Delicious, light, fluffy scones - with a hint of almond. Just as nice the next day!
My recipe for the ‘Ultimate Scone that’ll keep(!)’ is based upon one of the most highly rated scone recipes I’ve found. I believe that Jane Hornby’s original Classic Scone recipe was first printed in the BBC’s Good Food magazine in 2007 and it fully warrants its 5 star rating. There’s absolutely no doubt that it’s a marvel, in no small part due to the 'tips' outlined in the method, which I have not been able to better.
My problem has been that, as there’s just two of us, however hard we try (!) we cannot finish a batch of scones on the day they’re baked. I know good scones can be frozen and, after defrosting, can be reheated BUT what a faff (i.e. it’s quicker to bake another batch!) and, the truth is, they’re still second best.
So, after lots of trial and error, I’ve ‘tinkered’ with the ingredients (but NOT the method!) and now bake scones that can be enjoyed fresh from the oven and, if stored in an airtight container, are still delicious the next day (and even 2 or 3 days after baking, not that they’ll ever last that long).
Before launching into the recipe, a quick word of advice. As with just about any ‘cake’ recipe, it’s very important to be accurate with your weights and measures. This recipe takes precision a step further, in that every element - oven temperature, timing and order of events - needs to be followed with just as much rigour. This done, perfect results every time!
Preheat the oven to 220ºC/Gas 7
Ingredients (in sequence)
300g Self raising flour
1 tsp baking powder
85g cubed and fridge-cold butter
pinch of salt
3 level tablespoons caster sugar
50g ground almonds
150ml milk
squeeze of lemon juice
most of 1 beaten egg (I use a large free range egg)
tip of a spoon of vanilla bean paste
½ tsp almond extract
the remaining beaten egg
Method
1. Sift the SR flour and baking powder into a large bowl
2. Rub in the cubed butter using your fingertips. Take your time over this as the butter must be thoroughly combined
3. Using a spatula (or even better a baker’s scraper) mix in the caster sugar, ground almonds and salt
4. Pop a baking sheet into the oven
5. Microwave the milk for 30 seconds at full power. Whisk in the vanilla bean extract, almond extract and most of the beaten egg (leave a little to brush the top of the scones just before they go in the oven) and once combined, add the squeeze of lemon juice.
6. Make a well in the dry ingredients and pour in the ‘milk mix’
7. Now you’re in a hurry for the remaining 4 stages(!), using a spatula or scraper, mix the ingredients using a cutting and turning action (in much the same fashion as you would if mixing in egg whites). Its quite a wet mix, don’t worry as this will encourage you to handle the ‘dough’ with kid gloves.
8. Turn the mix out onto a floured surface, dust your hands well with flour and lightly pat the dough into a ball (the baker’s scraper is a great tool to help you at this stage).
9. Pat the scone mix down very lightly (don’t be tempted to use a rolling pin - just use the flat of your hand) until it is about 2 inches (5cm) thick. Using a 2 inch round cutter dipped in flour cut out your first scones (aim for six). Reform the remainders into an oval - again using a very light touch - and cut two further scones.
10. Take the baking sheet from the oven, line it, ideally using Bake-o-glide, lay out the scones, brush the tops (only) with the reserved egg and pop in the oven for 10 minutes
11. After 10 minutes - and not before(!) - check the scones, turn them to ensure they brown evenly, and, if necessary, pop them back in for a further 2 or 3 minutes.
12. The end result should be a wonderfully risen ‘golden’ topped scone, that you should cool on a wire rack for a few minutes before enjoying with your favourite topping(s). Raspberry jam with a sprinkling of toasted almonds is a super treat.
13. Any remaining scones can be stored in an airtight container and enjoyed over the next day or two either cold or gently warmed through - the addition of egg and the ground almonds really does seem to turn these scones into ‘keepers’.
Monday 19 November 2012
Friday 9 November 2012
Stem Ginger and Lemon Buns recipe
Inspired by one of Clare's favourite infusions (she doesn't like normal tea - can you believe it!), I've tinkered with my Zesty Lemony Buns recipe and early taste tests suggest this combo's a winner!

You'll need 12 muffin cases and a 12 hole muffin tin. Set the oven to 200°C/ 390°F/gas 6. A handheld electric mixer is best for this recipe.
Ingredients (in ounces again, just like the older recipes!)
4oz butter
6oz self-raising flour
6oz caster sugar
2 large free range eggs
3 tbsp milk
1 lemon, zest and juice
2 stem ginger 'balls' (I use Opies Stem ginger in syrup) plus I or 2 tablespoons of the ginger syrup
First, in a largish microwave safe bowl, zap the butter for 1 minute at the lowest setting. Now add the flour and caster sugar. Mix the two eggs with the milk and around one third of the lemon juice (this will be a scant tablespoon) and add this to the butter, flour and sugar. Using your hand electric mixer, whizz this thoroughly until the mixture lightens in colour and all of the ingredients are combined. Cut one and a half of the stem ginger balls into smallish dice and fold the dice, along with half the lemon zest into the mixture.
It's now ready to be divided into the 12 muffin cases - try a level tablespoon in each and then top-up until all are evenly filled. Tap down onto the work-surface to level and pop into the middle of the pre-heated oven for 15 minutes. Turn around the bun tin to ensure an even bake and pop back in for another 5 minutes or until nicely browned on top and firm to the touch.
While the buns are in the oven, make the glaze by gently heating the stem ginger syrup with the remaining lemon juice and zest. Cut the remaining stem ginger ball into batons and add these too. Gently heat the glaze and leave to infuse.
Keeping the buns in the tin and while they are still warm, prick them all over and spoon over the glaze (around a teaspoon for each). Any remaining glaze can be brushed on to give an 'all over' gloss to each bun.
Perfect with proper black tea (I love Lipton's Yellow Label which I drink straight - i.e. no milk or sugar, a taste I acquired in France) or if you like it, Earl Grey or, if you're like Clare, Tetley's Revive & Revitalise Lemon & Ginger
Monday 13 February 2012
Easy-peasy sultana (and brandy!) cake recipe
What makes this recipe so easy and (almost) foolproof, is the preparation process - you just need a set of scales, a reasonably large saucepan and a wooden/silicone mixing spoon.
Set the oven to 180ºC/gas mark 4 and line a medium size cake tin with baking parchment (I use a 18cm square tin or a 20cm round with a pre-formed liner).
Ingredients
120g unsalted butter
180g brown or golden unrefined sugar (as mentioned above, take your pick from the store cupboard!)
400g sultanas (or other dried fruit that you want to use up!)
180ml water
1 tsp bicarbonate of soda
1 tsp mixed spice
120g plain flour
120g self-raising flour
2 large free range eggs, beaten
Optional but very good!
60ml brandy (cheap spanish brandy at 36º proof is ideal!)
Place the butter, sugar, fruit, water, bicarb. and mixed spice in a largish saucepan and heat through, stirring, until 'frothy'. Reduce heat and continue stirring for around 2 minutes, then remove from heat and allow to cool a little. 5 minutes should do.
Then add the flour and eggs to the mix and beat vigorously with the spoon until well combined. Pour into the prepared cake tin and pop into the oven for 60 minutes (if, like me, you oven cooks unevenly, turn after 50 minutes). The cake should now be well-risen and feel firm to the touch. (If not pop back in the oven for no more than 10 minutes.)
If you are adding the brandy, leave the cake for 5 minutes, pierce the top all over with a skewer, then sprinkle on the alcohol, allowing it to soak into the warm cake.
After around 10 minutes, the cake should be removed from the tin and allowed to cool to room temperature on a wire rack. Great when freshly made, as a dessert - maybe with some brandy flavoured cream, custard or vanilla ice cream. Also as a cake with coffee (especially if prepared as the Italians do, with their 'caffè corretto'!)
Monday 23 January 2012
Zesty Lemony Buns recipe

You'll need 12 muffin cases and a 12 hole muffin tin. Set the oven to 200°C/ 390°F/gas 6. A handheld electric mixer is best for this recipe.
Ingredients (in ounces this time, as it's one of my older recipes!)
4oz butter
6oz self-raising flour
6oz Caster sugar
2 large free range eggs
3 tbsp milk
3 lemons - grated zest from 2 and juice from all three
an extra 3 tbsp Caster sugar for the glaze
First, in a largish microwave safe bowl, zap the butter for 1 minute at the lowest setting.
Now add the flour, caster sugar and the two eggs to the butter. Give it a quick mix just to roughly combine the eggs with the butter, sugar and flour. Now add the milk and the zest and juice from one of the lemons (about 1 tbsp) and mix again until it looks thoroughly mixed and lightens in colour. It's now ready to be divided into the 12 muffin cases - try a heaped dessertspoon in each and then top-up until all are evenly filled. Tap down onto the work-surface to level and pop into the middle of the pre-heated oven for 15 minutes. Turn around the bun tin to ensure an even bake and pop back in for another 5 minutes or until nicely browned on top and firm to the touch.
While the buns are in the oven, make the glaze by gently heating the remaining juice, zest and reserved caster sugar in a pan on the top of the oven. Don't stir, just move the liquid around in the pan and stop cooking once the glaze has reduced by around third to a half (about 2 tbsp).
Keeping the buns in the tin and while they are still warm, prick them all over and spoon over the glaze (around a half teaspoon for each). Any remaining glaze can be brushed on to give an 'all over' gloss to each bun.
I'd be surprised if these buns hang around - but they will keep in an airtight tin for up to a week.
Wednesday 18 January 2012
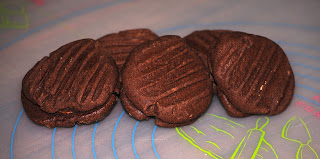
Chocolate Melting Moments Recipe
This recipe is specially for Rachel (and Leon, Louie and Ruby), as they enjoyed them so much and even left one or two for Clare and me.
I'm not quite sure how to describe these lovely treats - they're a bit cookie-like I suppose. I first saw them made on a Rachel Allen TV programme and made some scribbled notes on the ingredients but not the method - so it's been a bit of trial and error arriving at the process described below. Two notes of warning: the first is that you mustn't panic at the point when it seems that the mix is too dry and 'sandy' to ever come together into a smooth paste. The second is more of a health warning - these treats are just irresistible and are best hidden well away from chocaholics!
You'll need either one large ar two smaller baking trays (I line trays with reusable "bak-o-glide" - but simple greaseproof is fine, as these Melting Moments don't seem to stick) and a wire rack for cooling the 'cookies'.
Its also worth double-sifting the dry ingredients to make sure they're thoroughly mixed.
Set the oven to 180C/gas 4.
Ingredients:
125g lightly salted butter at room temperature (the salt seems to enhance the chocolate flavour)
100g plain flour
50g icing sugar
50g cornflour
25g Cocoa powder
a jar of Nutella or Green & Black's Hazelnut Chocolate spread
First beat the butter, either with a mixer or wooden spoon until smooth and 'fluffy'. Next add the double-sifted dry ingredients, all in on go, and start working the mixture with a wooden spoon, pressing it into the side of the bowl and making sure its all thoroughly combined (it'll look like chocolatey sand).
Now dive into the bowl with one (clean) hand and start squeezing the mixture together, persevere with this and you'll find that it will start to come together. Once the mix has formed into a smooth paste ball, stop working it and roll it on a lightly floured surface into a regular shaped 'log' (think rolling pin). Cut this into three equal segments. Then divide each segment into six or eight balls of equal size. You'll end up with 18 or 24 balls.
Space these balls on the baking tray(s) and press down lightly with the back of a fork. Now pop into the preheated oven for 10-12 minutes. When you take them out of the oven, don't be tempted to touch them as they're easily 'dented' (you'll have to trust that they're cooked). After 5 minutes, carefully remove them from the tray and allow to cool on a wire rack.
Once they have cooled and can be handled, carefully sandwich them together with Nutella or even better Green & Black's if you can find it. Count them carefully - you'll start with 9 or 12 Melting Moments that I can guarantee will disappear, as if by magic, before your very eyes! Yum!
I'm not quite sure how to describe these lovely treats - they're a bit cookie-like I suppose. I first saw them made on a Rachel Allen TV programme and made some scribbled notes on the ingredients but not the method - so it's been a bit of trial and error arriving at the process described below. Two notes of warning: the first is that you mustn't panic at the point when it seems that the mix is too dry and 'sandy' to ever come together into a smooth paste. The second is more of a health warning - these treats are just irresistible and are best hidden well away from chocaholics!

You'll need either one large ar two smaller baking trays (I line trays with reusable "bak-o-glide" - but simple greaseproof is fine, as these Melting Moments don't seem to stick) and a wire rack for cooling the 'cookies'.
Its also worth double-sifting the dry ingredients to make sure they're thoroughly mixed.
Set the oven to 180C/gas 4.
Ingredients:
125g lightly salted butter at room temperature (the salt seems to enhance the chocolate flavour)
100g plain flour
50g icing sugar
50g cornflour
25g Cocoa powder
a jar of Nutella or Green & Black's Hazelnut Chocolate spread
First beat the butter, either with a mixer or wooden spoon until smooth and 'fluffy'. Next add the double-sifted dry ingredients, all in on go, and start working the mixture with a wooden spoon, pressing it into the side of the bowl and making sure its all thoroughly combined (it'll look like chocolatey sand).
Now dive into the bowl with one (clean) hand and start squeezing the mixture together, persevere with this and you'll find that it will start to come together. Once the mix has formed into a smooth paste ball, stop working it and roll it on a lightly floured surface into a regular shaped 'log' (think rolling pin). Cut this into three equal segments. Then divide each segment into six or eight balls of equal size. You'll end up with 18 or 24 balls.
Space these balls on the baking tray(s) and press down lightly with the back of a fork. Now pop into the preheated oven for 10-12 minutes. When you take them out of the oven, don't be tempted to touch them as they're easily 'dented' (you'll have to trust that they're cooked). After 5 minutes, carefully remove them from the tray and allow to cool on a wire rack.
Once they have cooled and can be handled, carefully sandwich them together with Nutella or even better Green & Black's if you can find it. Count them carefully - you'll start with 9 or 12 Melting Moments that I can guarantee will disappear, as if by magic, before your very eyes! Yum!
Sunday 15 January 2012
Apple & Sultana Cake Recipe
This is one of my favourite cake recipes, that's also good as a dessert (put another way, it serves both roles really well). It's also great if you have some eating apples that have been sitting around in the fruit bowl for a while that you'd like to use up.
The recipe's origin is the delightful Dorset Apple Cake - but the West Country recipe uses Bramley apples, whereas I prefer to use eaters, as they retain their shape and (unlike Bramleys) some of their texture. I also like to add sultanas and a touch of cinnamon (this is probably because I also love Dutch Apple cake - thanks to mum and my other Dutch relations!).
Here's what you need: a well greased and lined 9" round springform cake tin, or a standard tin with a preformed parchment liner (my preferred option). Set the oven to 180°C/360°F/gas 4.
Ingredients:
225g salted butter (or use unsalted and add a pinch of salt) at room temperature
225g unrefined caster sugar
225g SR flour
450g (around 5) 'tart' eating apples (e.g. Jazz, Braeburn or Pink Lady)
1 unwaxed lemon (zest and juice)
30-50g ground almonds
60g sultanas
3 large free range eggs at room temperature
1 heaped tsp baking powder
1 level teaspoon cinnamon
Peel, core and dice the apples (aim for 1 cm cubes) into a large mixing bowl and immediately pour over the lemon juice to stop the apples browning (even better, pour the juice in first and dice the apples into the juice, stirring after each apple). Mix the apples with the ground almonds and lemon zest. Stir in the sultanas. You'll find that the almonds and sultanas will soak up any lemon juice that's not been absorbed by the apples.
In another bowl, cream the butter and sugar (look for the colour to change, it should really look very pale). I find it best to use a hand mixer for this. Next add the first egg - start with the mixer at its slowest speed, until the egg has just combined, then shift up to full speed until smooth, light and creamy. Repeat with the other two eggs.
Mix the flour, baking powder and cinnamon and sift into the bowl with the butter/sugar mixture. Using a cutting action, lightly fold in the flour. Now add the batter to the bowl with the apples and fold in using as light a touch as you can. Once fully combined, pour the mix into the prepared cake tin and pop into the pre-heated oven.
After 50 minutes, turn the cake around and cover with a circle of parchment (to stop the cake over browning). After another 20 minutes, check that it has baked through - I press the surface and if it feels firm and rebounds to the touch, it's probably ready. If unsure, another 10 minutes in the oven won't harm, as it is, by its nature, a very moist cake.
Leave to cool in the tin for 10 to 15 minutes then remove from the tin and allow to cool further on a wire rack. If serving as a dessert, it's ready to serve after about 20 minutes. Keep the rest (or the whole cake, once cooled) in an airtight tin for up to a week.
A topping of toasted slivered almonds and demerara sugar adds a lovely finishing touch.
Wednesday 11 January 2012
Jambalaya recipe
When we had our restaurant in France, our supplier of foie gras, cuisse de canard confit and fantastic magret de canard gras would often have a surfeit of aiguillettes de canard (the fillet under the breast). He would supply these to us at a 'bargain' price and this encouraged me to come up with a couple of recipes. One, roulade d'aiguillettes de canard farcie, I would serve in the restaurant (as its inspiration was clearly local); the other, Jambalaya, was specially for us and visiting friends and family from the UK. All thanks to 'Keith Floyd's American pie' for giving me the idea.
Here's the recipe (PS I have found duck fillets in Waitrose but if you can't find them for some reason, cooked free range chicken is a good substitute - mix the breast and thigh meat and be sure to use the carcass to make the stock.)
Ingredients for 2
250g of duck fillets
125g of cooking chorizo
1 red pepper chopped
1 stick celery chopped
1 large onion chopped
A glug of olive oil
2 cloves garlic, finely chopped
120 - 140g paella rice (2 good handfuls)
1 tsp sweet smoked paprika
1/2 tsp hot smoked paprika
300g of duck or chicken stock warmed through (a Kallo organic free range chicken stock cube is fine)
pinch of saffron threads
salt & pepper to taste
a small handful of chopped parsley
Start by dicing the duck filets and chorizo (aim for the same size dice) and preparing the vegetables (again, aim for the same size dice).
Warm a paella pan or large non-stick frying pan, add a glug of olive oil, and then the diced vegetables (hold back the garlic). Once the onions become translucent, add the diced chorizo and garlic, cook until the chorizo 'juices' have been released. Now add the rice and paprika and stir thoroughly, so that every grain has coated with the oil. Next add the diced duck (or chicken, if using) and stir through again. Now you are ready to add the stock, all in one go, as well as the saffron threads. Stir through and leave to bubble gently for around 15 minutes (no need to stir). After this time, the rice should have soaked up most of the stock and you'll need to give the pan a bit more attention. Turn the mix from the outside edges into the centre and level off and keep doing this until the liquid has virtually gone. It's 'done' once the rice has cooked through and it just starts to 'catch' on the bottom (around 25 minutes from adding the stock). At this stage, sprinkle with the chopped parsley, turn off the heat and leave to 'rest' for a few minutes (cover with a lid if you have one big enough)
Enjoy, and try to be even-handed when it comes to scraping the caramelised bits stuck to the bottom of the pan!
Tuesday 10 January 2012
Almond & Lemon Drizzle cake recipe
This cake has a very close texture and a mouthwatering tangy 'edge'. Whilst it will keep (and even improve with keeping) for up to a week, once you've tried it, bet you have to go back for a second slice ... and then another. So, be warned!
You'll need a 1lb loaf tin and I like to use a pre-formed baking parchment liner sold by Lakeland (amongst others). You'll see why I recommend this sort of liner when it comes to adding the drizzle.
As this is an all-in-one cake mix it's ideal for a food processor (or mixer).
Pre-heat the oven to 180ºC/350ºF/gas 4.
Ingredients for the cake:
125g Self-raising flour
125g Ground almonds
125g Sugar (golden castor or soft brown)
125g Softened unsalted butter (I do this in the microwave - 60 seconds at the lowest setting)
3 large free-range eggs, lightly beaten
3 unwaxed lemons - grated peel from all three and juice of two (juice third lemon for drizzle - see below)
pinch of salt
1 tsp baking powder
Tip all of the dry ingredients - flour, almonds, sugar, salt and baking powder - into the mixer bowl and mix thoroughly (i.e. a quick whizz, if using a processor). Then add the grated lemon zest and mix again.
Next add the 'wet' ingredients - softened butter, beaten eggs and juice from two of the lemons - and whizz until you have a smooth, thick batter. (If using a processor, check that there are no unmixed dry ingredients around the edge/bottom of the bowl).
Pour the batter into the prepared loaf tin, tap down on work-surface to smooth and pop into the pre-heated oven for 50 minutes. Check after 40 minutes and turn round if your oven cooks unevenly. The cake is cooked when firm to the touch and it passes 'the skewer test'. Don't worry if there is a big crack across the top - this really helps the cake soak up the drizzle!
Allow to cool a little in the tin (and liner) before adding drizzle.
ingredient for the drizzle
Juice from 2 lemons
Equal weight of icing sugar
Make the drizzle when you've taken the cake out of the oven.
To make the drizzle, weigh the juice (it'll be around 80g) and add an equal weight of icing sugar, mix well and allow to stand while you prick the surface of the cake all over with a skewer or toothpick. Now mix the lemon/sugar mixture again and spoon carefully all over the cake - it may seem like a lot of drizzle but left to stand it will all soak in.
Now, the cake is ready and you should give it a try straight away. Otherwise, if you can resist the temptation, allow to cool and store in an airtight tin. (If you've used a pre-formed parchment liner, keep the cake in this as it takes a while for the drizzle to soak in.)
Subscribe to:
Posts (Atom)